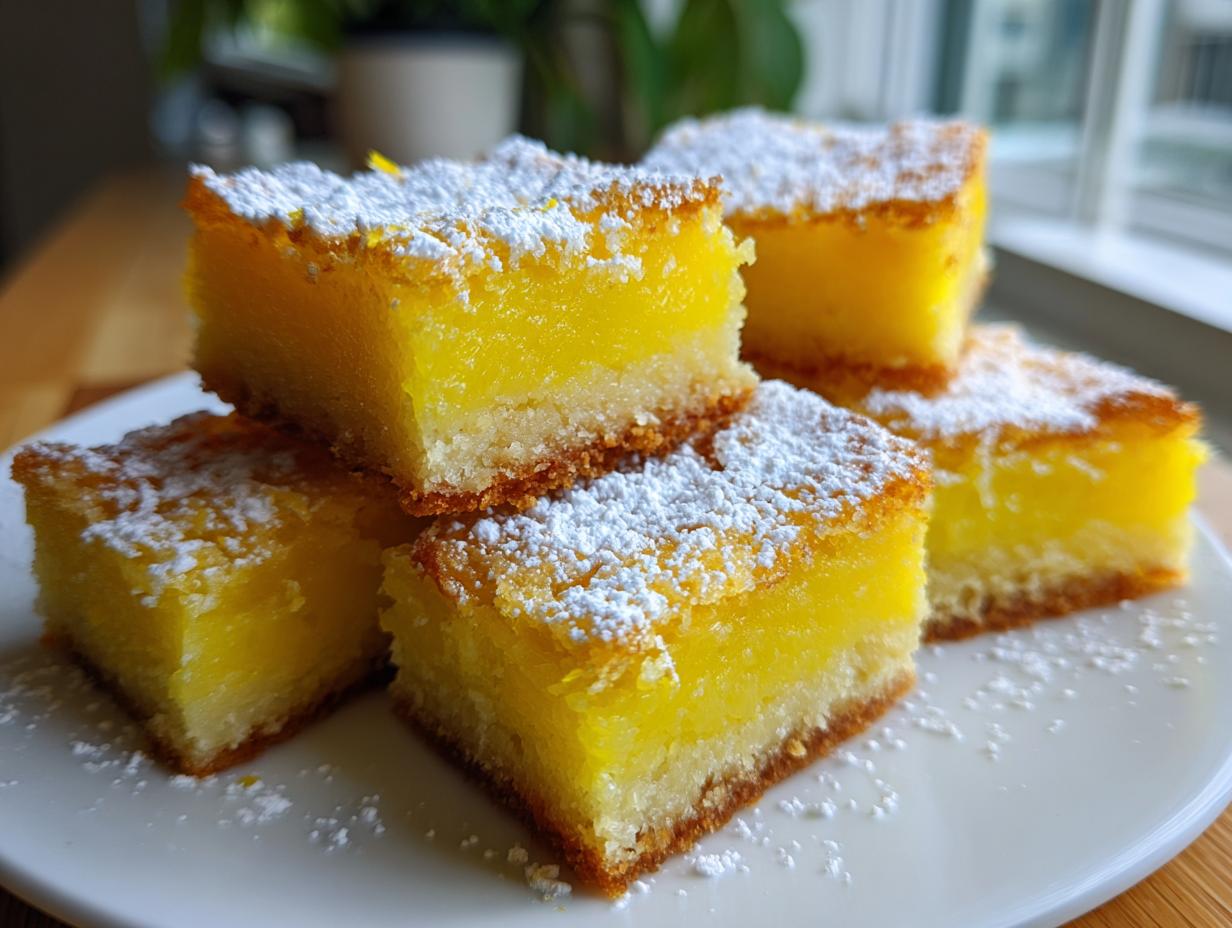
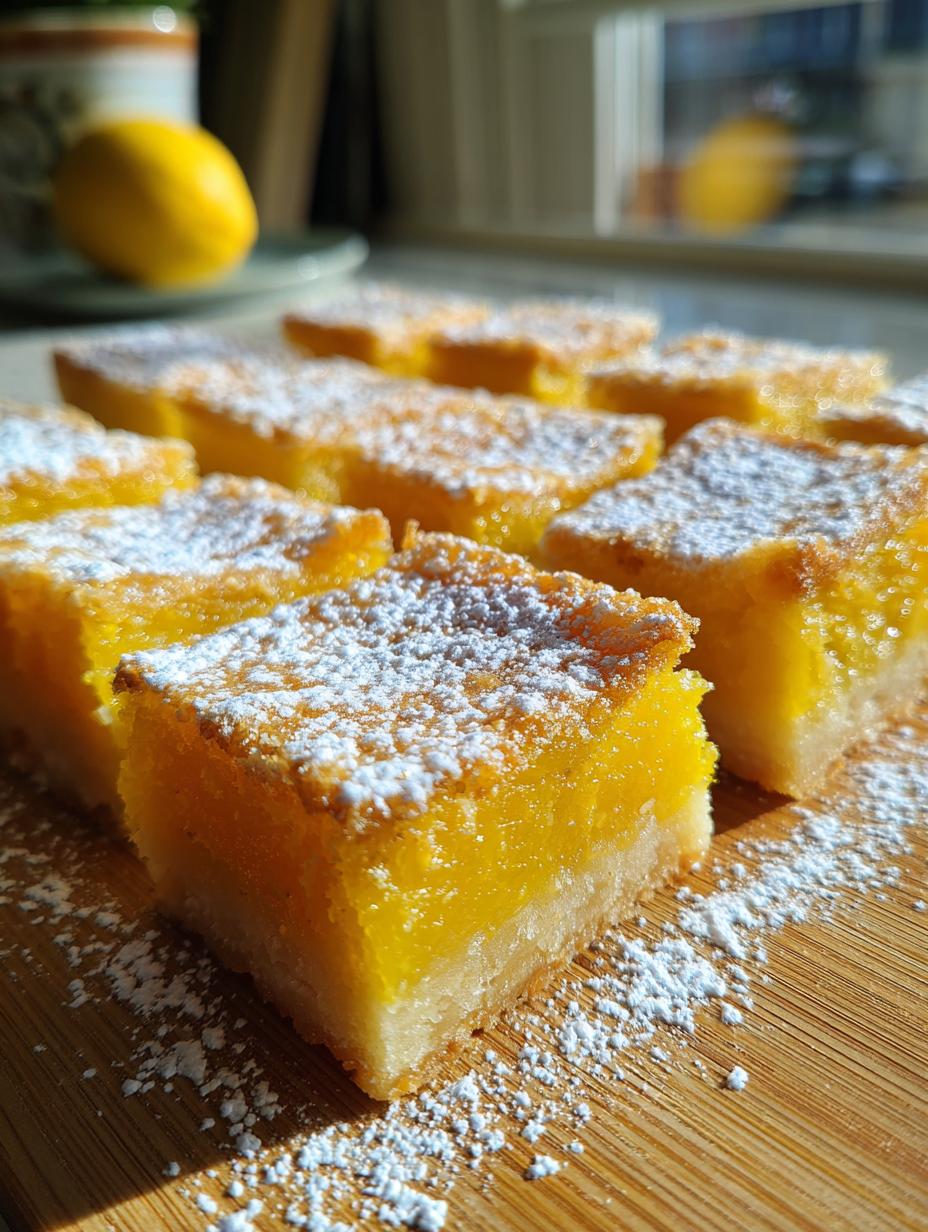
Oh, let me tell you about these Christmas lemon bars! They’re a delightful twist on a classic dessert, combining that zesty, tangy lemon flavor with a buttery crust that’s simply melt-in-your-mouth good. Each bite is like a burst of sunshine, perfect for brightening up those cozy winter days. I remember the first time I made these lemon bars during the holiday season. My kitchen was filled with the fresh scent of lemon zest, and I couldn’t wait to share them with family and friends. They disappeared faster than I could blink!
What makes this recipe even more special is how it brings everyone together. Every time I whip up a batch of these Christmas lemon bars, I can see the smiles on my loved ones’ faces as they take their first bite. It’s a tradition now, a must-have at our holiday gatherings. So if you’re looking for a dessert that’s not only easy to make but also bursting with flavor, these Christmas lemon bars are the answer. Trust me, once you try them, you’ll find yourself making them year after year!
Why You’ll Love This Recipe
These Christmas lemon bars are more than just a dessert; they’re a delightful experience that will brighten up your holiday season. Here’s why you’re going to adore them:
- Irresistible Flavor: The tangy lemon filling perfectly contrasts with the buttery crust, creating a deliciously refreshing treat that everyone will crave.
- Easy to Make: With just a handful of ingredients and straightforward steps, you’ll have these bars whipped up in no time – perfect for busy holiday schedules!
- Perfect for Sharing: These lemon bars are ideal for holiday gatherings, potlucks, or even just cozy family nights. Their vibrant flavor and beautiful presentation make them a hit with guests.
- Make-Ahead Friendly: You can easily prepare these bars in advance, allowing you to enjoy more time with family and friends while still serving up a homemade treat.
- Customizable: Feel free to get creative! Dust them with powdered sugar, add a dollop of whipped cream, or even serve with fresh berries for an extra festive touch.
Trust me, once you taste these Christmas lemon bars, you’ll be hooked! They encapsulate all the joy of the holiday season in every delicious bite.
Ingredients List
To make these delightful Christmas lemon bars, you’ll need the following ingredients:
For the Crust
- 1 cup unsalted butter, softened
- 1/2 cup granulated sugar
- 1 cup all-purpose flour
For the Lemon Filling
- 2 large eggs
- 1 cup granulated sugar
- 1/4 cup fresh lemon juice
- 1 tsp lemon zest
- 1/4 tsp baking powder
Make sure to have everything measured out and ready to go before you start. Trust me, it makes the process so much smoother and more enjoyable!
How to Prepare Christmas Lemon Bars
Now, let’s dive into the delicious process of making these Christmas lemon bars! It’s easier than you might think, and I promise it’ll be worth every minute. Just follow these steps, and you’ll have a scrumptious treat ready for your holiday table!
Preparing the Crust
First things first, preheat your oven to 350°F (175°C) so it’s nice and warm when you’re ready to bake. In a mixing bowl, cream together that softened unsalted butter and 1/2 cup of granulated sugar. You want to mix until it’s light and fluffy – think of it like whipping up a little cloud of joy! This usually takes about 2-3 minutes. Next, gently stir in 1 cup of all-purpose flour until everything is well combined. The dough will be a bit crumbly, which is perfectly fine.
Now, it’s time to press this mixture evenly into the bottom of your baking dish. I like to use my fingers for this part; it’s a bit therapeutic! Just make sure it’s nice and even, so it bakes beautifully. Pop that crust into the oven and let it bake for about 15 minutes, or until it’s lightly golden. You’ll know it’s done when it starts to smell heavenly!
Making the Lemon Filling
While the crust is baking, let’s whip up the lemon filling! In a separate bowl, whisk together the 2 large eggs, 1 cup of granulated sugar, 1/4 cup of fresh lemon juice, 1 teaspoon of lemon zest, and 1/4 teaspoon of baking powder. Whisk until everything is well blended and smooth. The zingy aroma of the lemon juice will make your kitchen smell like a citrus paradise. It’s so refreshing!
Baking the Bars
Once your crust is golden, take it out of the oven and carefully pour that luscious lemon filling over the top. Spread it out evenly, and then pop it back in the oven for an additional 20 minutes. You’ll want to keep an eye on it – the filling should be set but still have a slight jiggle in the center. That’s how you know it’s perfectly creamy! When it’s done, let the bars cool completely in the baking dish before cutting them into squares. This is crucial because it helps them hold their shape. Trust me, the wait will be worth it!
Tips for Success
Getting these Christmas lemon bars just right is all about attention to detail and a few helpful hints. Follow these tips, and I promise you’ll end up with a batch that impresses everyone!
- Use Quality Ingredients: Fresh ingredients make a world of difference. Go for real lemons for the juice and zest, and make sure your butter is unsalted and softened to room temperature. Trust me, it enhances the flavor like nothing else!
- Don’t Skip the Cooling Time: After baking, let the bars cool completely in the baking dish before cutting. This step is vital for achieving those clean, neat squares. I know it’s tempting to dive right in, but patience pays off!
- Serving Suggestions: For an extra festive touch, dust the cooled bars with powdered sugar before serving. You could also add a dollop of whipped cream or serve them with fresh berries on the side. It adds a lovely contrast to the tart lemon flavor!
- Storage Tips: Keep any leftovers in an airtight container in the fridge. They’re actually even better the next day as the flavors meld together. Just be sure to enjoy them within a week!
- Experiment with Flavors: If you want to switch things up, consider adding a hint of vanilla extract to the lemon filling or even a little coconut for a tropical twist. The base recipe is super versatile!
With these tips, you’ll be on your way to making the best Christmas lemon bars that’ll have everyone asking for seconds!
Nutritional Information
Before you dive into these delicious Christmas lemon bars, let’s chat about the nutritional information! Keep in mind that nutrition values can vary based on the specific ingredients and brands you use, so these are just estimates.
Each Christmas lemon bar contains approximately:
- Calories: 150
- Fat: 7g
- Saturated Fat: 4g
- Cholesterol: 50mg
- Sodium: 100mg
- Carbohydrates: 20g
- Fiber: 0g
- Sugar: 10g
- Protein: 2g
- Vitamin A: 250 IU
- Vitamin C: 5mg
- Calcium: 20mg
- Iron: 1mg
So, while these bars are a treat, they also bring a bit of sunshine to your holiday festivities! Enjoy them in moderation, and remember, it’s all about balance. Happy baking!
FAQ Section
Can I make these Christmas lemon bars ahead of time?
Absolutely! You can make these Christmas lemon bars a day or two in advance, which is perfect for planning your holiday festivities. Just follow the recipe as directed, and once they’ve cooled completely, cover them tightly with plastic wrap or place them in an airtight container in the refrigerator. This way, the flavors will meld beautifully, and you’ll have a delicious treat ready to serve when the time comes!
What can I substitute for fresh lemon juice?
If you don’t have fresh lemon juice on hand, you can use bottled lemon juice as a substitute. However, keep in mind that fresh lemons provide a brighter flavor! If you want to get creative, you can also try using lime juice for a slightly different twist, or even a mix of lemon juice and a bit of orange juice for a sweeter citrus flavor. Just make sure to adjust the quantity to your taste!
How do I store leftover lemon bars?
To store leftover lemon bars, simply place them in an airtight container and keep them in the refrigerator. They’ll stay fresh for about a week. If you want to keep them longer, you can freeze them! Just wrap each bar in plastic wrap and then place them in a freezer-safe container. When you’re ready to enjoy them, thaw them in the fridge overnight. They’re just as delicious after a little time in the freezer!
Serving Suggestions
Now that you’ve baked these delightful Christmas lemon bars, let’s talk about how to make them even more festive and enjoyable! Here are some fun serving ideas that will enhance the overall experience:
- With a Dusting of Powdered Sugar: A light dusting of powdered sugar adds a lovely touch of sweetness and a beautiful contrast to the bright lemon flavor. Just sprinkle some right before serving for a pretty presentation!
- Pair with Whipped Cream: A dollop of freshly whipped cream on the side creates a creamy balance to the tartness of the lemon bars. You can even add a hint of vanilla to the cream for an extra flavor boost!
- Fresh Berries: Serve these lemon bars alongside a handful of fresh berries like raspberries or blueberries. Their natural sweetness and juiciness complement the zesty lemon beautifully!
- Coconut Flakes: For a tropical twist, sprinkle some sweetened coconut flakes on top of your lemon bars. It creates a fun texture and adds a hint of sweetness that pairs perfectly with the tart lemon.
- Tea or Coffee: These lemon bars are fantastic with a warm cup of tea or coffee. The citrus notes of the bars harmonize beautifully with the rich flavors of your favorite brew, making it a cozy treat for any winter gathering.
Feel free to mix and match these suggestions to create your perfect serving experience! Trust me, these little touches can elevate your Christmas lemon bars from delicious to truly unforgettable!
Equipment Needed
Before you dive into making these delightful Christmas lemon bars, let’s make sure you have all the right tools at your fingertips. Here’s what you’ll need:
- Mixing Bowl: A good-sized mixing bowl is essential for creaming the butter and sugar, as well as for combining ingredients for the lemon filling. I prefer using a glass or stainless steel bowl for easy mixing!
- Baking Dish: A 9×9-inch baking dish works perfectly for these bars. If you want thicker bars, you could use an 8×8-inch dish, but just keep an eye on the baking time!
- Whisk: A whisk is a must for blending the egg and lemon filling together smoothly. If you don’t have one, a fork can work in a pinch, but a whisk makes it so much easier!
- Measuring Cups and Spoons: Accuracy is key in baking, so be sure to have your measuring cups and spoons ready to go. They’ll help you get those ingredient amounts just right!
- Spatula: A rubber spatula is great for scraping down the sides of your mixing bowl and ensuring you get every last bit of that delicious batter into the baking dish.
- Cooling Rack: If you have one, a cooling rack is perfect for letting your lemon bars cool evenly after baking. It helps prevent them from getting soggy on the bottom!
Having these tools ready will make your baking experience smooth and enjoyable. Trust me, it’s all about being prepared so you can focus on creating those scrumptious Christmas lemon bars!

Christmas Lemon Bars
Equipment
- Mixing bowl
- Baking dish
Ingredients
For the Crust
- 1 cup unsalted butter softened
- 1/2 cup granulated sugar
- 1 cup all-purpose flour
For the Lemon Filling
- 2 large eggs
- 1 cup granulated sugar
- 1/4 cup fresh lemon juice
- 1 tsp lemon zest
- 1/4 tsp baking powder
Instructions
- Preheat the oven to 350°F (175°C).
- In a mixing bowl, cream the butter and sugar for the crust until light and fluffy.
- Stir in the flour until well combined. Press the mixture evenly into the bottom of a baking dish.
- Bake the crust for 15 minutes or until lightly golden.
- In another bowl, whisk together the eggs, sugar, lemon juice, lemon zest, and baking powder for the filling.
- Pour the filling over the baked crust and return to the oven for an additional 20 minutes.
- Let cool before cutting into bars.