Oh my goodness, you guys! There’s just something about the holidays that makes me want to get into the kitchen and make ALL the things. And honestly, for me, nothing screams “Happy Holidays!” quite like a jar of homemade Christmas Jam. It’s not just food; it’s a little hug in a jar, you know? I’ve been making this particular Christmas Jam recipe for years now, tweaking it here and there until it’s absolutely perfect. It all started with my mom, who always had a batch simmering on the stove around Thanksgiving, filling the whole house with the most incredible cranberry and spice aroma. That smell just takes me right back to being a kid, patiently (or not so patiently!) waiting for a taste.
This isn’t just any jam; it’s *the* Christmas Jam recipe. It’s super easy, comes together in a flash, and tastes like pure festive magic. Seriously, if you’re looking for a homemade gift that everyone will adore, or just something to make your own holiday mornings extra special, you have to try this. Trust me, once you make your own batch, you’ll never go back to store-bought for the holidays!
Why You’ll Love This Christmas Jam Recipe
So, why should *you* dive into making this Christmas Jam recipe? Oh, let me count the ways!
- It’s seriously quick to prepare – we’re talking about 40 minutes from start to jar!
- It’s the absolute best for holiday gifting. Picture this: a pretty ribbon, a cute tag, and a jar of this homemade goodness. Instant cheer!
- Talk about versatile! Spread it on toast, swirl it into yogurt, pair it with cheese, or even use it as a glaze for ham.
- The taste is out of this world – a perfect balance of tart cranberries, sweet strawberries, and warm spices that just screams “holiday magic.”
- It fills your home with the most incredible festive aroma. Seriously, forget the candles; this jam is your holiday scent diffuser!
The Joy of Homemade Christmas Jam
There’s just something incredibly satisfying about making your own Christmas Jam, isn’t there? It’s not like those bland, store-bought versions that all taste the same. This jam has *character*! The aroma alone, as it simmers on your stove, is enough to get you into the holiday spirit. Plus, there’s that special touch of knowing you made it yourself. It’s a little bit of love, bottled up and ready to share, and that’s truly the best part!
Essential Equipment for Your Christmas Jam
Okay, so before we get our hands sticky with all that delicious fruit, let’s talk tools! You don’t need a fancy chef’s kitchen for this Christmas Jam recipe, but having the right gear makes the whole process so much smoother and safer. These are the things I grab every single time I make a batch, and trust me, they make a huge difference!
Tools for a Perfect Christmas Jam Recipe
First up, you’ll definitely need a really large pot. We’re talking big, because that jam is going to be bubbling and you don’t want it boiling over! Then, for storing our precious Christmas Jam, you’ll need canning jars. Make sure they’re clean and sterilized, especially if you’re planning on actual canning. A ladle, a potato masher, and a funnel for getting the jam into the jars are also super helpful!
Ingredients for Christmas Jam Recipe
Alright, let’s get down to the good stuff – what you’ll need to make this incredible Christmas Jam recipe! The beauty of this jam is that it uses pretty simple ingredients, but when they come together, WOW. Quality really does matter here, especially for those beautiful fruits. So, grab your shopping list, and let’s make sure you have everything ready for a super festive jam session!
- 12 oz fresh cranberries
- 16 oz fresh strawberries, hulled and chopped
- 4 cups granulated sugar
- 1 large orange, zested and juiced
- 1/2 tsp ground cinnamon
- 1/4 tsp ground cloves
- 1/4 tsp ground nutmeg
Fresh Fruits for Your Christmas Jam
When it comes to the fruit for this Christmas Jam recipe, fresh is definitely best! You’ll want 12 ounces of fresh cranberries – those little tart gems are what give our jam that beautiful color and holiday zing. And then, for sweetness and that gorgeous red hue, grab 16 ounces of fresh strawberries. Make sure they’re hulled and chopped before you start. Trust me, the fresh fruit makes all the difference in flavor and texture!
Sweeteners and Spices for Christmas Jam
Now for the magic makers! For sweetness, we’re using a good amount of 4 cups of granulated sugar. Don’t skimp, it helps with the set and flavor! Then, for that bright, citrusy punch, you’ll need 1 large orange – we’re going to use both the zest AND the juice. And finally, the spices that make it *Christmas* jam: 1/2 teaspoon ground cinnamon, 1/4 teaspoon ground cloves, and 1/4 teaspoon ground nutmeg. These warm spices are just heavenly together!
How to Make Your Christmas Jam Recipe
Okay, deep breaths everyone! This is where the real fun begins, and honestly, it’s super straightforward. I’m going to walk you through each step for this Christmas Jam recipe, just like I’d tell my best friend. Don’t overthink it, just follow along, and soon your kitchen will smell absolutely divine and you’ll have jars of festive goodness ready to go. You’ve got this!
Preparing the Fruit Mixture for Christmas Jam
First things first, grab that big, trusty pot! You’re going to toss in all those beautiful fresh cranberries and the hulled, chopped strawberries. Then, add in your granulated sugar, the bright orange zest, the freshly squeezed orange juice, and all those warm, cozy spices – the cinnamon, cloves, and nutmeg. Give it a really good stir to combine everything. You want that sugar to start dissolving and coat all the fruit. It’s okay if it looks a little chunky now, that’s totally normal!
Cooking and Thickening Your Christmas Jam
Now, place your pot over medium-high heat. You’re going to want to bring this mixture to a rolling boil, stirring constantly. Seriously, don’t walk away! That sugar can stick and burn if you’re not careful. Once it’s boiling, reduce the heat to medium-low and let it simmer. This is where the magic happens! Simmer for about 15-20 minutes, or until the jam starts to thicken up. You’ll see the cranberries burst, and the strawberries will get super soft. You can tell it’s getting there when your spoon leaves a clear path on the bottom of the pot. Keep stirring occasionally so nothing sticks!
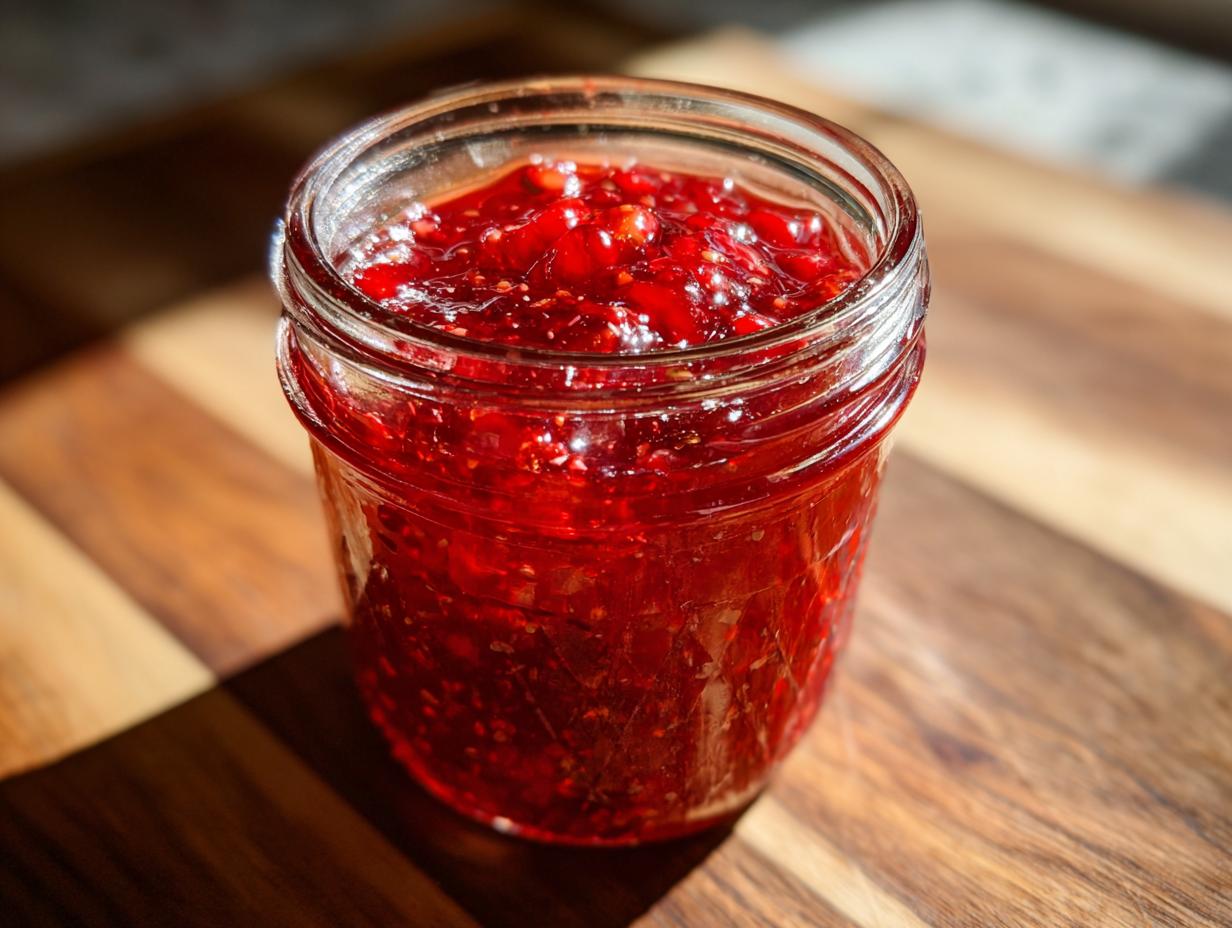
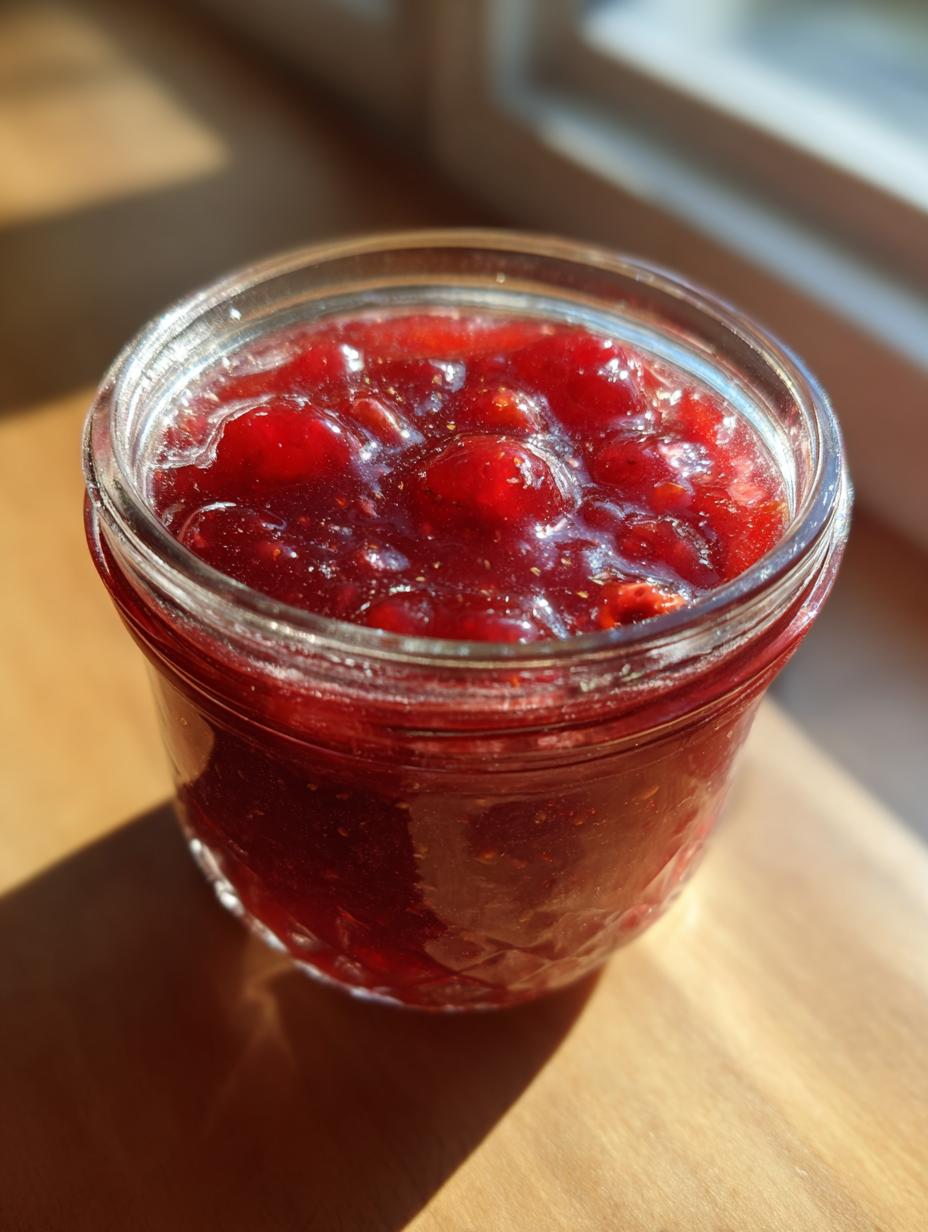
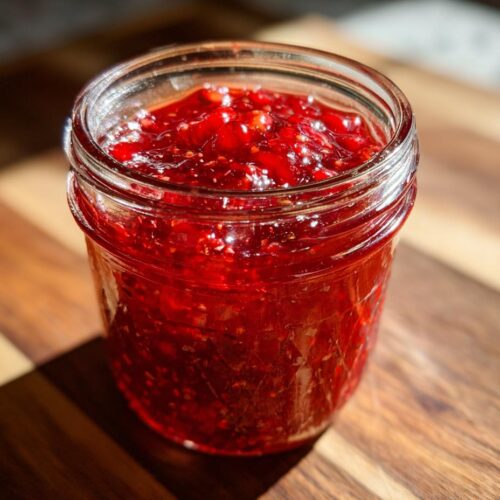
Finishing and Jarring the Christmas Jam
Once your jam has thickened to your liking, you can mash the fruit a bit with a potato masher or a fork if you prefer a smoother jam. Just be super careful, because those hot splashes are no joke! Now, take it off the heat. It’s time to get it into jars! Ladle that gorgeous, hot jam into your sterilized canning jars, making sure to leave about 1/4 inch headspace at the top. You can process these in a boiling water canner if you’re into proper canning (which I totally recommend for gifts!), or just let them cool and pop them in the fridge for up to three weeks. Easy peasy, right?
Tips for the Best Christmas Jam Recipe
Okay, so you’ve made your jam, and it’s looking (and smelling!) amazing. But how do you make sure it’s absolutely perfect every single time? I’ve got a few little tricks up my sleeve that I’ve learned over the years to make sure this Christmas Jam recipe is always a winner. These aren’t hard, promise! Just little nudges to make your jam making journey a breeze and avoid any sticky situations (pun intended!).
Achieving Perfect Consistency in Your Christmas Jam
The trickiest part for new jam makers is often knowing when it’s “set.” My favorite way to check for perfect consistency is the cold plate test! Pop a small ceramic plate in the freezer before you start cooking. When you think the jam is ready, spoon a tiny bit onto the cold plate, wait 30 seconds, then push it with your finger. If it wrinkles, it’s ready! If it’s too runny, just keep simmering for a few more minutes and retest.
Storing Your Homemade Christmas Jam
Once you’ve got those beautiful jars of Christmas Jam, you’ll want to make sure they last! If you’ve followed proper canning procedures (like a boiling water bath), your jam will be shelf-stable for up to a year in a cool, dark place. How cool is that?! If you’re skipping the canning process, no worries at all! Just let the jam cool completely, then pop those jars into the refrigerator. It’ll stay fresh and delicious for about three weeks in there. Perfect for enjoying all through the holidays!
Christmas Jam Recipe: Frequently Asked Questions
Okay, so you’ve got questions, and I’ve got answers! It’s totally normal to wonder about a few things when you’re making a new recipe, especially something like jam. I’ve heard these questions a bunch over the years, so I figured I’d tackle them here to make sure your Christmas Jam recipe experience is super smooth and successful. Let’s dive in!
Can I use frozen fruit for this Christmas Jam Recipe?
Absolutely, you can! If fresh cranberries or strawberries aren’t looking their best, or if you’re making this Christmas Jam recipe off-season, frozen fruit works just fine. Just make sure to thaw them completely before you start cooking. You might find there’s a little extra liquid, so you might need to simmer your jam for an extra few minutes to get that perfect set, but otherwise, it’s pretty much the same glorious jam!
How do I know if my Christmas Jam has set?
Ah, the million-dollar question for jam makers! Besides the cold plate test I mentioned, you can also look for the “sheet test.” Dip a cold spoon into the jam, lift it, and turn it horizontally. If the jam forms a “sheet” or two drops that run together and fall off the spoon, it’s ready! It takes a little practice, but you’ll get the hang of knowing when your Christmas Jam is perfect.
How long does homemade Christmas Jam last?
Great question! If you’ve properly processed your Christmas Jam in a boiling water canner, those sealed jars will be good for up to a year (sometimes even longer!) in a cool, dark pantry. Once you open a jar, or if you skipped canning and just refrigerated it, your homemade Christmas Jam will keep happily in the fridge for about 3 weeks. Enjoy it often!
Estimated Nutritional Information
Okay, so while I’m all about the taste and joy of this Christmas Jam recipe, I know some of you like to keep an eye on the numbers! While I can’t give you exact figures (because every berry is a little different, and brands vary!), I can give you a general idea. Per serving (which is roughly 2 tablespoons), you’re looking at around 60-70 calories, with minimal fat (less than 1g), about 0.5g of protein, and roughly 15-18g of carbohydrates (mostly from the sugar and fruit, of course!). Just remember, these are estimates, and your actual values might vary a bit depending on your specific ingredients!
Share Your Christmas Jam Creations
Okay, so now that you’ve whipped up your own batch of this amazing Christmas Jam, I want to hear all about it! Did you make it for gifts? Did you slather it on toast this morning? Please, please, please drop a comment below and tell me how it went! What’s your favorite way to enjoy this festive spread? And if you snap a pic, tag me on social media! I absolutely LOVE seeing your creations. Don’t forget to rate this Christmas Jam recipe too – it helps other home cooks find this little gem!

Christmas Jam
Equipment
- Large pot
- Canning jars
Ingredients
- 12 oz fresh cranberries
- 16 oz fresh strawberries hulled and chopped
- 4 cups granulated sugar
- 1 large orange zested and juiced
- 1/2 tsp ground cinnamon
- 1/4 tsp ground cloves
- 1/4 tsp ground nutmeg
Instructions
- Combine cranberries, strawberries, sugar, orange zest, orange juice, cinnamon, cloves, and nutmeg in a large pot. Stir to combine.
- Bring the mixture to a boil over medium-high heat, stirring constantly to dissolve the sugar.
- Reduce heat to medium-low and simmer for 15-20 minutes, or until the jam thickens. The cranberries will burst and the strawberries will soften.
- Mash the fruit slightly with a potato masher or fork if you prefer a smoother jam. Be careful of hot splashes.
- Remove from heat. Ladle the hot jam into sterilized canning jars, leaving 1/4 inch headspace.
- Process jars in a boiling water canner for 10 minutes, or follow your preferred canning method. Alternatively, cool and store in the refrigerator for up to 3 weeks.